Showing posts with label Crafty "how to". Show all posts

Sunday, 24 July 2016

Mermaid hair in the making

Today jenni and I decided to celebrate leaving our respective jobs and their restrictive dress codes by dying our hair mermaid colours.
We only had one developing cap, and because I am a real gentleman I let jenni have it. So please enjoy this photo of me with a loo roll bag on my head developing the dye.
#1st world problems.
Fingers crossed it'll look awesome and therefore be worth it.

Monday, 18 July 2016

Last night at Brownies!

Lisa, Kelly Tasha and I are all leaving brownies- Lisa is off to uni in Germany, Kelly and tasha both have new jobs as primary school teachers outside of the county so just aren't going to be back in time and I am off to Swindon.
I leave my minions in the capable hands of Caroline and Tats- but it's still the end of an era!

Chips and a party in the park to celebrate!


Friday, 3 June 2016

Flip flop wreath for Kelly's Nan's Funeral

Kelly text me last week after her Nan passed away and asked for my help in making a flip flop wreath.
I'm not flower arranger and my crafting is very gung-ho, so I was a bit worried about being tasked with so much responsibility.

On Wednesday we met up in town to but provisions- 10 pairs of flip flops, a glue gun, flowers and fripperies. We debated using fresh flowers but the wreath needs to make it to devon in one piece so they were rejected on grounds of practicality.

I think we did a really good job, although there was appoint where we were convinced our coffee table was going to have to go to devon because the wreath was stuck to it.

A thoughtful a fitting tribute to a seaside loving, flipflop wearing Nan, with a wicked sense of humour.

Friday, 29 April 2016

Perogi

I'm going to have a go at making some eastern european foods- Under Tat's guidance and information that is is all "delicious, except the pickled cabbage". So, I have decided to have a go at making these (With some gluten free and lacto free substitutions, of course). These sound like turkish pancakes but a bit easier to make.

Sauerkraut, Potato & Cheese Pierogi

Makes roughly 4 dozen pierogi
You can substitute two cups of leftover mashed potatoes for the mashed potatoes in this recipe.
Pierogi dough:3 cups all-purpose flour, plus extra as needed
1 teaspoon salt
1 large egg
1/4 cup sour cream
3/4 cup water
Pierogi filling:
1 pound potatoes (I prefer red-skinned, but russet or yukon golds are fine)
2 tablespoons sour cream
1/4 teaspoon salt
1 cup drained sauerkraut
2 cups shredded sharp cheddar cheese
To serve:3 tablespoons butter
1 small yellow onion, sliced thinly
To make the dough, whisk together the flour and salt in the bowl of a standing mixer (or regular mixing bowl). Whisk together the egg, sour cream, and water until combined, and then pour over the flour. Stir together the liquids and the flour with a wooden spoon or spatula until a shaggy dough is formed.
Knead the dough the mixer on low speed with the dough hook attachment until the dough is very smooth and soft, about 5 minutes. Alternatively, knead by hand against the counter for 8 minutes. If the dough seems very sticky after a few minutes of kneading, add a tablespoon of flour at a time until it starts coming together into a smooth ball. Cover and set aside to rest on the counter while you make the filling.
To make the filling, scrub the potatoes clean and place them in a 2- or 4-quart sauce pan. Cover with an inch or two of water and set over high heat. When the water comes to a boil, reduce the heat to medium-low and simmer until the potatoes are tender when pierced by a fork, 6 to 10 minutes depending on the size of your potatoes.
Transfer the potatoes to a mixing bowl with a slotted spoon. Remove the peels if desired (I like to leave them on!). Mash the potatoes into large chunks with a potato masher or a dinner fork. Add the sour cream and salt, and continue mashing until the potatoes are smooth. Add the sauerkraut and cheese, and stir to combine. Taste and add more salt if needed.
Shape the filling into 1" balls (roughly the diameter of a quarter) and arrange them on a dinner plate. Pre-shaping the filling makes it easier and quicker to shape the pierogi.
Line a baking sheet with parchment and sprinkle generously with flour. Set this near your workspace.
Divide the pierogi dough in half, working with one half at a time and keeping the other half covered. Sprinkle your work surface with flour and roll out the pierogi dough to 1/8" thick. Stop occasionally to lift the dough and make sure it's not sticking to the work surface; use more flour as needed. If the dough shrinks back as you roll, let it sit for 5 minutes and then roll again.
Use a 3" biscuit cutter or drinking glass to cut the dough into rounds. Gather the scraps and set them aside.
To shape the pierogi, hold one of the rounds of dough in the palm of your hand and set a ball of filling in the middle. Fold the round in half, pinching it closed at the top and then working your way along the sides to form a half-moon shape. Make sure the edges of the dough are completely sealed. Set the pierogi on the floured baking sheet.
Continue to shape pierogi with the remaining rounds of dough. Lay them close together on the baking sheet, but don't let them touch. Roll out the second half of the dough, and cut and shape the pierogi as described. When finished, roll the scrapes and continue to make as many pierogi as you can. You should end up with roughly 4 dozen pierogi.
→ Recipe Tip! No matter what, I always seem to end up with either a few leftover balls of filling or an extra bit of dough. C'est la vie! The balls are delicious eaten as a snack, even cold from the fridge. The scraps of dough can be rolled out, sliced into spaghetti-thin strips, and then boiled just like pasta for an afternoon snack.
At this point, the pierogi can be boiled and served right away or frozen. To freeze, place the sheet pan of pierogi in the freezer and freeze until solid. Transfer the frozen pierogi to a freezer container and freeze for up to three months. Pierogi can be cooked straight from the freezer.
When ready to cook the pierogi, melt the butter in a large skillet over medium heat. Add the onions and cook until the onions are translucent, very soft, and beginning to brown, 8 to 10 minutes. Push the onions to the edges of the pan where they will stay warm and continue to caramelize.
Meanwhile, bring a large pot of water to a boil. Salt generously. Working in batches, add 10 or so pierogi to the boiling water and stir to make sure they don't stick to the bottom. Cook the pierogi until all the pierogi have floated to the surface and then 1 to 2 minutes longer to make sure the filling gets hot — 8 to 10 minutes total.
Transfer the pierogi to the pan with the onions. Turn the heat to medium-high. Cook the pierogi without moving until they are golden and crispy on the bottoms, 2 to 3 minutes. If you're cooking more batches, transfer the pierogi to a serving dish. Once all the pierogi have been boiled and crisped, scrape the onions over the pierogi and gently stir to coat the pierogi with butter and onions. Serve immediately while hot.
Per serving, based on 10 servings. (% daily value)
Calories
338
Fat
14.7 g (22.7%)
Saturated
8.9 g (44.6%)
Trans
0.1 g
Carbs
38.9 g (13%)
Fiber
2.6 g (10.5%)
Sugars
1.6 g
Protein
12.5 g (24.9%)
Cholesterol
59.7 mg (19.9%)
Sodium
567.3 mg (23.6%)


Friday, 11 March 2016

Updating jewellery


Looking through boxes at my parents I found my granny's old broach. It's costume jewellery so nothing expensive but it is sentimental to me.
It's something she used to wear- and when she wasn't wearing it it lived out on her dressing table. It still smells a bit of her face powder. which is really nostalgic and comforting.

Broaches are a bit old fashioned now. I do wear them on my coat sometimes but the take a bit of a hammering so this is not one I'd be willing to sacrifice to fashion. Instead I'm going to thread it onto ribbon and make it into a pendant necklace. This may result in being stabbed in the chest quite a bit more than with a usual necklace, but I think it's a nice way to make something sentimental wearable, without damaging it (I know I could get the pin removed, but if at a later date I do want to wear it properly, like my Granny did, I won't be able to. It's a bit too final). I am excited for being so spangly.

Bring on the black ribbon!

Bedford creative arts rebranding event

I'm looking forward to attending this tomorrow- There will be cake and dancing and drawing!
All the good things!
The Lane is the wine bar by the Higgins, not an actual lane. I was pretty bamboozled by that. But that means it'll be easy to go to bed pop too as that is in the higgins!

rebrand launch event – we need you!

Join us at the Lane, Bedford on Saturday 12 March from 10am for a very special event.
Together with you and the Bedfordshire community we have been fundamental in making art happen in for 30 years & we’re really proud to have worked with so many exciting artists and members of the public.
As of the 12 March we will launch our exciting new logo & name & would love you to be a part of it. The event will give everyone a chance to be part of our new look for the future, we invite you to put pen to paper and make your mark on our future.
The team will be at The Lane on Saturday 12 March 2016 from 10am with well-known local artist David Litchfield, creative agency We Can Creative, a Lone Morris dancer, a trio from the Last Chance Ragtime Band and lots of pens for you to help us create our new look.
Our new logo, like our programme, wouldn’t exist without the involvement of people like you. As an organisation we are brought to life by the people, artists and communities that get involved in the work we do & this will continue to be at the heart of our ethos. It will also be at the centre of our new visual identity.
We’ll always be locally focused & will continue to work closely with the community who have made us what we are today.
With cake also on offer to fuel your creative spirit there is nothing to stop you from helping this work in progress.


Friday, 4 March 2016

Blanket for pregs and kelly's baby

I have put my Crochet skills to good use once again to make a baby blanket for my colleague. I started this almost a month ago whilst he was on his paternity leave and it's still not finished! If I don't get a move on the baby will be too big to fit in it!
Still, I'm sure the thought will be appreciated. It was a whole department effort with Phil, Tina, and Suzi crocheting bits too.
I have just been left to complete the project. That may have been an error...

Friday, 19 February 2016

Baking please! Lemon and blueberry brownies

15 Times Lemon And Blueberry Were Relationship Goals http://www.buzzfeed.com/emmymax/15-times-lemon-blueberry-proved-they-had-a-bette-25wf8

Lemon Thyme Brownies with Stewed Blueberry Icing and Pistachios
Here's What You Need:
  • Brownies:
  • 3/4 cup flour
  • 3/4 cup sugar
  • 1/2 teaspoon ground thyme
  • 1/4 teaspoon salt
  • 1/2 cup unsalted butter, room temperature
  • 2 eggs
  • 2 tablespoons lemon juice
  • 1 tablespoon lemon zest (approx. 1 lemon)
  • Icing:
  • 3/4 cup blueberries
  • 2 tablespoons lemon juice
  • 1/2 cup powdered sugar
  • 2 tablespoons lemon juice
  • 1/2 cup powdered sugar
  • Topping:
  • Chopped Pistachios
  • Coarse sea salt
Here's What You Do:
  1. Preheat oven to 350 F degrees. Line a 8x8" pan with parchment paper and non stick spray. Set aside.
  2. In a large bowl, combine flour, sugar, thyme, salt, and butter until just mixed.
  3. In a small bowl, combine eggs, lemon juice, and lemon zest. Whisk thoroughly to combine.
  4. Add egg mixture to flour mixture. Mix until just combined. 
  5. Pour batter into prepared pan and bake for 20 minutes (if you have a dark pan like me), or 23-25 minutes if using a lighter colored pan, until edges are light brown.
  6. Remove from oven and allow to cool in the pan.
  7. In a small bowl, mix lemon juice and powdered sugar to form thick glaze. Spread over cooled brownies.
  8. In small saucepan, combine blueberries and lemon juice. Allow to cook on medium heat for 5 minutes or until blueberries have released a significant amount of juice. 
  9. Remove pan from heat and allow to cool.
  10. Half mixture, and transfer half to a small bowl. Set aside other half for another use.
  11. Mix in powdered sugar to make a runny glaze.
  12. Cut brownies and drizzle blueberries over the top. Use as much or as little as you want.
  13. Chop pistachios and sprinkle on top with sea salt to your liking.
 LEMON THYME BROWNIES

Sunday, 14 February 2016

No sew teepee instructions from "The handmade home"

http://www.thehandmadehome.net/2013/02/a-no-sew-teepee/

I cannot explain how badly I need this, and if it wouldn't cause my boyfriend to kill me, I could probably have already constructed this genius object in my front room.
I will be patient and wait until we have some outside space. and then I will build my anti sunburn outdoor reading hiding place (After a trip to south all for suitable materials, of course).


Our final product measures about seven and a half feet tall by 6 feet wide. We wanted something large enough to hold all three kiddos, without taking over our entire house. This little hut can stand on it’s own all winter, and when we’re finito, we’ll simply fold it up and stash it away. (See: under our bed.)
teepee_skeleton
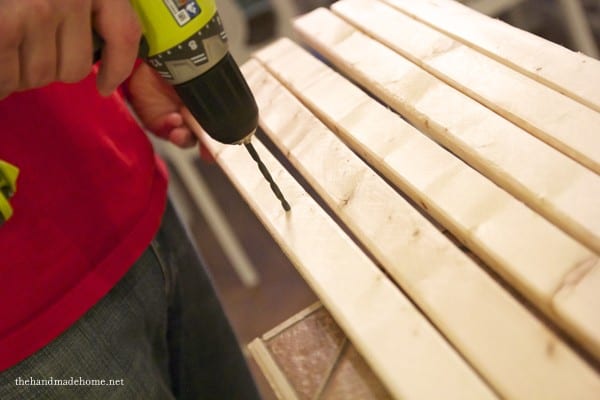
We purchased six 1 x 2 x 8’s at our local store. On each piece of wood, we measured 1 foot down and in the center, drilled a hole using a RYOBI cordless drill. This is for the jute that will hold it all together.
I wish I had a photo of us putting it together, but it really wasn’t that complicated. You’ll definitely need an extra set of arms, but we just gradually positioned the poles, and as we added each one, strung them all through with jute until they felt right for a teepee shape. When we were finished, we wrapped it around until it was secure.
Because this tee pee is currently residing on the tile of our veranda, we used some hot glue to stabilize the bottoms on the floor. When we’re finished, we’ll just pop it up.
hand_made_teepee
It’s not perfect, so let go of the notion and don’t let it drive you crazy if you decide to tackle this one. It’s fun and that’s all that matters.
fabric_hoarder
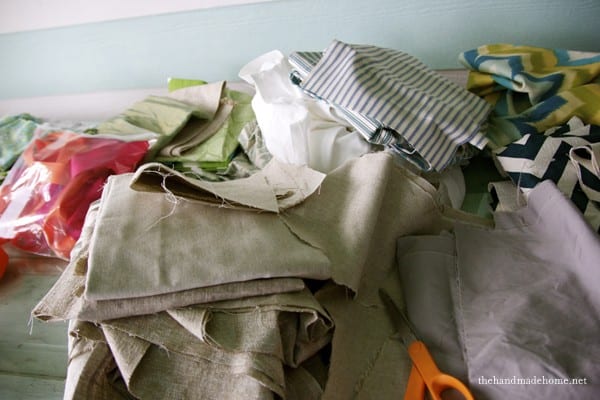
The second best part to this whole insane little creation? The total cost for us with this teepee, was a whopping seven dollars. Why? Because we only paid for the wood. I decided to use this project as a fabric buster… Apparently I’m a little bit of a fabric hoarder in denial. I measure fabric for products like I do spaghetti and I’m all, what? It’s not three yards in a foot? Then I have enough fabric to cover a small village (or build a few teepees) and it sits in my cabinets for three years. Alas. Sigh. Digression.
Consider this a little project to get your purge on. I even purchased two large drop cloths from the hardware store (which we will now be returning) but you could slice one up, and supplement with patterned fabrics in between.
I actually knocked this out in a day, and once you get into the groove of it, there’s a learning curve. I recommend it as a weekend project if you want to take your time. (If you’re anything like me, once you’ve started you don’t want your kids dive bombing all your fabric or singeing off their hair in the glue gun, so you just want to finish.)
I wanted something fun and frilly since you can see it from all corners of the house, but a second alternative would be to take a simple drop cloth, drape it over and pinch it in place with a giant clip. I’ve seen those floating around the interwebs as well.
wrapping_fabric
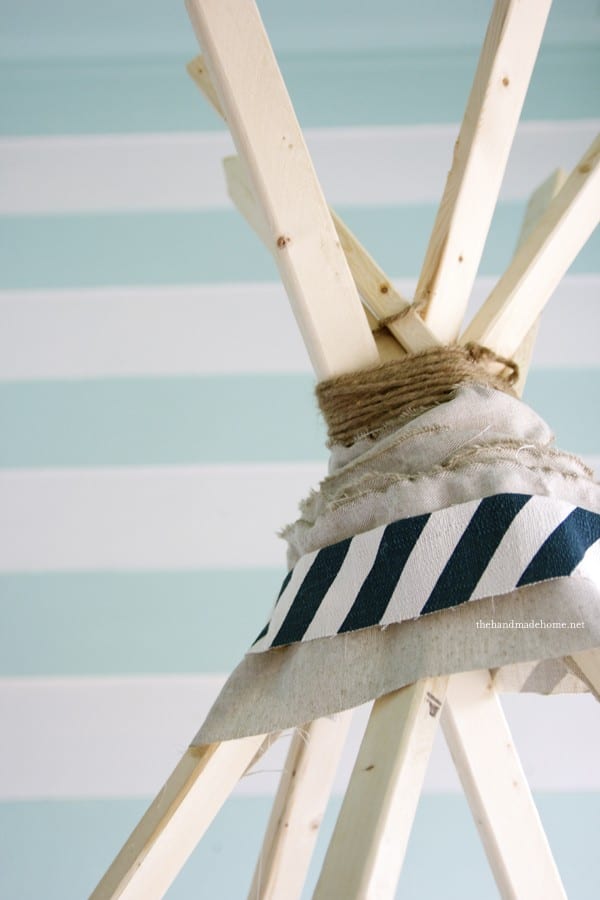
So I eyeballed it and starting at the top, cut my fabric into strips. I simply mimicked the rope action above, because the top part was a bit jumbled and complicated. I layered a few pieces, and secured them with glue. Tada! The top of my teepee. (Tipi. Tepee.)
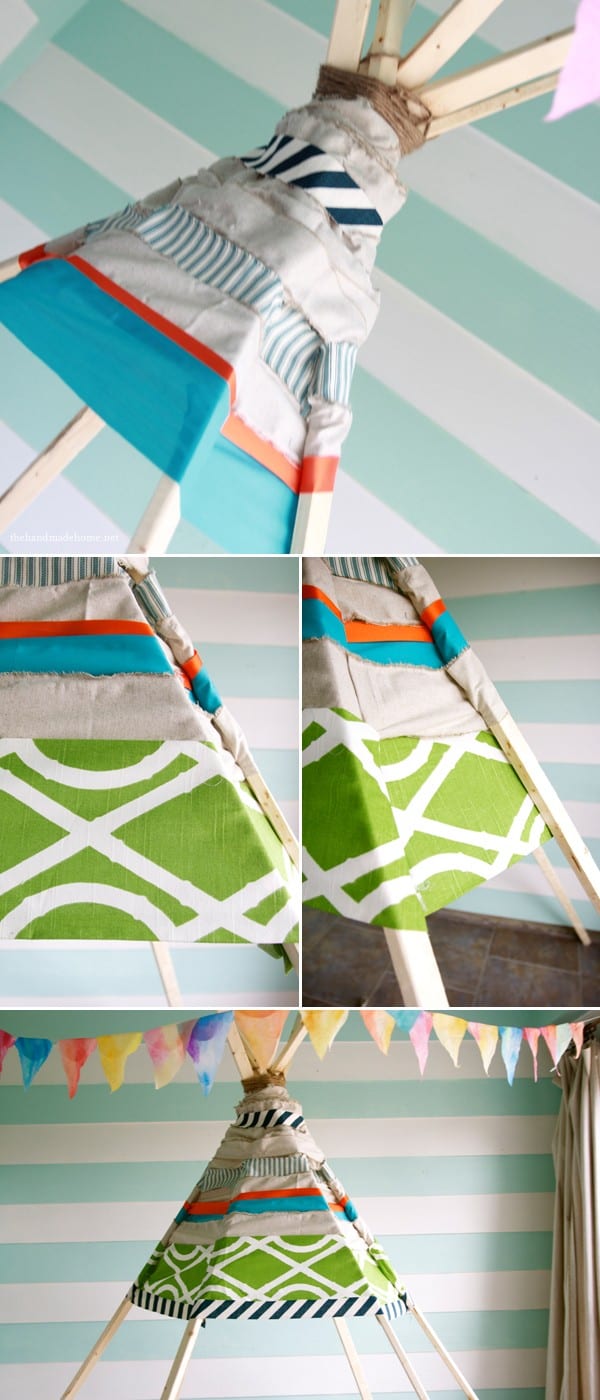
Once I was about half a foot down, I began a system of ‘weaving’ the fabric through the poles. Since I was choosing from my fabric stash, I would eyeball to make sure I had enough, and cut to length. The pattern went over, under, over, under. When one section was under, I made sure the next section tucked around the pole, so that it was hidden. I just made sure to hot glue as I went, and hide the wood.
how_to_glue_your_fabricA few more hints:
• It doesn’t really matter how you do it, as long as you establish consistency. I found myself touching it up as I went. You can go back and tuck and glue and fold, until it looks right.
• Because this style is really made up of pieces of fabric, it will have a ‘ribbony look’. Read: gaps. I went back on the inside, and tacked the pieces together with hot glue. The kids said they like the ‘ribbon’, because they can peep through and see who’s coming. Eventually the hot glue will come loose, but it’s low maintenance and easy to repair.
• Put your glue gun on low, so a. you won’t singe the skin off your finger and curse the day you were born b. when you’re pressing said glued pieces together, it doesn’t take that long to dry.
• When you’re dealing with fatter pieces of fabric (see how I alternated my layers?) the angles with joining them from pole to pole will be a little more noticeable than with a skinny piece. Make sure they (the fat pieces of fabric) stretch all the way across from top to bottom, before securing with glue. There were a few sections I pulled down and had a redo. Thus the glue gun. Glue guns make everything okay.
• Make sure you save your biggest pieces of fabric for the bottom… the gaps get larger (and the pieces get longer) as you go.

Thursday, 4 February 2016

Glass mosaic photo frame


Please excuse the not-quite dry glue!

I wanted to make something for one of my colleges for her birthday so I have beautified a cheap wilkos wood effect photo frame into a thing of beauty!

Wood PVA and mosaic squares.  Deffo worth a go!

Saturday, 23 January 2016

How to make the perfect snowflake... Sadly a few months too late


Making Madelines


My mum ordered a madeline pan from Amazon, so we had to try it out. it turns out they're basically individual swiss rolls- I haven't made a fatless sponge since cookery in school!

Next I'd like to try Rachel Khoo's version...

Madeleines with lemon curd
This recipe for madeleines à la crème au citron was given to me by my friend Frankie Unsworth who, like me, studied pàtisserie at Le Cordon Bleu in Paris. The batter can be made in advance and then baked in time for tea: madeleines should always be eaten fresh from the oven.

Ingredients

For the madeleines
For the lemon curd

Preparation method

  1. Beat the eggs with the sugar until pale and frothy. Put the flour and baking powder into a separate bowl and add the lemon zest.
  2. Mix the honey and milk with the cooled butter, then add to the eggs. In two batches, fold in the flour. Cover and leave to rest in the fridge for a few hours, or overnight.
  3. Meanwhile, make the lemon curd. Put the lemon zest and juice, salt, sugar and butter into a small saucepan and heat gently until the sugar and butter have melted. Remove from the heat.
  4. Whisk the egg yolks in a bowl, then add to the pan and whisk vigorously. Return the pan to a low heat and whisk constantly as the curd starts to thicken. Don’t stop whisking or the eggs will curdle (if the curd starts to boil, take off the heat). Once the curd thickens and releases a bubble or two, remove from the heat and pass the curd through a sieve into a bowl. Place cling film in direct contact with the curd and refrigerate for at least an hour, preferably overnight.
  5. When you are ready to bake, preheat the oven to 190C/375F/Gas 5. Butter and flour a 12-shell madeleine tin. Put the lemon curd into a piping bag fitted with a small, pointed nozzle and place in the fridge.
  6. Put a heaped tablespoon of batter into each madeleine shell and press a raspberry deep into the batter.
  7. Bake for five minutes and turn the oven off for one minute (the madeleines will get their signature peaks), then turn the oven on to 160C/325F/Gas 3 and bake for a further five minutes. Transfer the madeleines to a wire rack and leave for a few minutes until cool enough to handle. Meanwhile, wash and dry the tin, then repeat the baking as for the first batch.
  8. While the second batch is baking, pop the piping nozzle into the mound in each baked madeleine and squirt in a teaspoon’s worth of lemon curd. Repeat with the second batch, then dust with icing sugar and serve straightaway.


Glass workshop


Sunday, 17 January 2016

Sushi making with Hayley

For my Birthday Traff got me a sushi making voucher (following Kirstie's rave review of the workshop!).
He hadn't had Sushi before and I got him to try some in Munich- which he hated.
He really doesn't like fish, and apparently the sea weed noori is too "fishy" for his delicate tastes, so he suggested I take someone else with me instead.

Hayley was more than happy to take his place! The workshop was awesome and we made a mountain of sushi.
We stayed afterwards and had some for lunch, and we still ad a box and a half each to take home- I'm going to have mind for lunch tomorrow at work. :D
Monday treats!